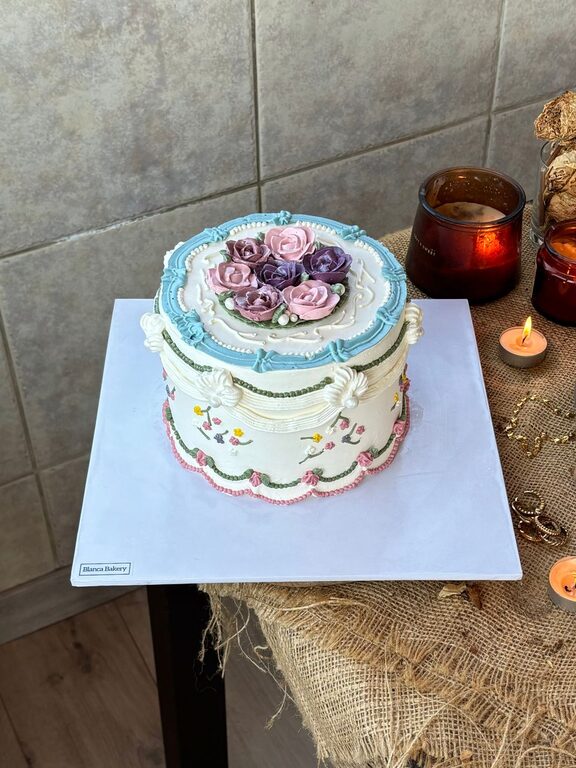
Decorating a cake does not have to involve complicated tools or advanced techniques. Some of the most charming cakes use simple shapes, soft colors, and a few carefully placed details. Vintage-inspired cake decorating is a wonderful style to explore because it feels elegant, playful, and personal without requiring perfect precision.
Inspired by old-fashioned bakery cakes, celebration cakes, and family recipes, this look often includes piped borders, delicate swirls, cheerful colors, and a slightly handmade finish. The goal is not to create a flawless display piece. Instead, it is to capture the warmth and character of a cake made with care.
What Makes a Cake Look Vintage Inspired?
Vintage-style cakes often combine a few recognizable details:
– Piped borders around the top and bottom edges
– Scallops, shells, rosettes, and simple swirls
– Soft pastel or slightly muted colors
– Small flowers, dots, bows, or leaves
– Layered decorations that create a decorative frame
– A balanced design with plenty of charm
Many vintage-inspired cakes use buttercream rather than fondant. Buttercream makes it easy to add texture and piped details, while its soft finish gives the cake a welcoming, homemade appearance.
You do not need to copy a particular decade or design. Think of vintage style as a starting point. You can use the colors, piping, and decorative shapes that feel most appealing to you.
Gather the Basic Tools
A small collection of supplies is enough to begin. You may already have many of these items in your kitchen.
Helpful Decorating Tools
– A turntable or rotating cake stand
– Offset spatula
– Bench scraper
– Piping bags
– Couplers, if you want to change tips easily
– A star piping tip
– A round piping tip
– A small petal or leaf tip
– Cake board
– Gel food coloring
– Small bowls for mixing colors
A turntable is especially useful because it allows you to smooth the sides and pipe even borders while turning the cake. If you do not have one, place the cake on a flat plate and rotate the plate by hand.
Start with two or three piping tips rather than buying a large collection. A star tip can create shells, stars, rosettes, and ruffles. A round tip is useful for dots, lettering, and fine lines. A leaf tip adds simple greenery to floral designs.
Choose a Soft, Coordinated Color Palette
Color is one of the easiest ways to create a vintage feeling. Soft shades often work well, including cream, dusty pink, pale blue, butter yellow, sage green, and lavender.
For a simple design, choose:
– One main frosting color
– One darker or brighter accent color
– One small contrasting shade
For example, a pale blue cake with white borders and yellow flowers feels cheerful and classic. A cream cake with soft pink piping and green leaves has a romantic look. You can also use one color in several shades for a gentle, layered effect.
Mix a little frosting in each color and test it on a piece of parchment paper before decorating the cake. This helps you see how the colors work together and gives you a chance to adjust them.
Prepare a Smooth Base
A neat base makes even simple decorations look polished. Begin with a completely cooled cake. If the layers are uneven, trim the tops gently with a serrated knife so they stack neatly.
Place the first layer on a cake board and add an even layer of frosting. Continue with the next layer, then spread a thin layer of frosting over the entire cake. This is called a crumb coat, and it helps keep loose cake crumbs from showing through the final layer.
Chill the cake briefly if the frosting feels soft. Then add the final layer, smoothing the top and sides with an offset spatula or bench scraper. The surface does not need to be perfectly sharp. A slightly soft finish can complement the nostalgic character of the design.
Practice Classic Piping Shapes
Vintage-inspired decorating depends more on repetition than complicated skills. Practice a few shapes on parchment paper before piping directly onto the cake.
Shell Borders
Hold the piping bag at a slight angle and squeeze steadily. Move the tip a short distance, then release pressure and pull away. Repeat the motion to create a row of shells. Shells work beautifully around the top or bottom edge of a cake.
Dots and Beads
Use a round tip to pipe small dots along the cake. Keep the pressure even, then stop squeezing before lifting the tip. Dots can fill small gaps, outline a design, or create a beaded border.
Rosettes
With a star tip, squeeze the piping bag while moving in a small circle. Finish in the center or outer edge, depending on the look you want. A few rosettes around the top of the cake can create a simple floral arrangement.
Ruffles
A petal tip can create delicate ruffles. Hold the wider side of the tip close to the cake and move the bag gently from side to side. Ruffles look lovely along the base, around the top edge, or in small sections between other decorations.
Build the Design in Layers
A simple way to plan your cake is to work from large details to small ones.
First, pipe the main border or large flowers. Next, add smaller swirls, leaves, and dots. Finally, look for empty spaces that need a small decorative touch.
Try to repeat shapes throughout the design. For example, if you use small shells around the base, echo them with a shell border around the top. Repeated details help the cake feel intentional and balanced.
Avoid covering every part of the cake. Open areas allow the main decorations to stand out and keep the design from looking crowded. A few well-placed details often have more impact than many unrelated decorations.
Add Personal Details
Vintage-inspired cakes become especially appealing when they include a handmade element. Consider adding a short message, the recipient’s initials, or a simple piped heart.
You can also decorate with:
– Tiny buttercream flowers
– Candied cherries
– Sprinkles in soft colors
– White chocolate curls
– Small edible pearls
– A paper cake topper
– A ribbon tied around the cake board
Keep non-edible decorations separate from the frosting and remove them before serving. If you use fresh flowers, make sure they are suitable for food presentation and keep stems from touching the cake directly.
Common Mistakes to Avoid
A few small adjustments can make decorating easier:
– Do not pipe onto warm cake or the frosting may slide.
– Avoid filling the piping bag too full, which can make it difficult to control.
– Keep the pressure steady for consistent shapes.
– Chill soft frosting for a few minutes before adding detailed piping.
– Practice new designs on parchment before using them on the cake.
– Do not worry about tiny imperfections; they often add to the handmade look.
If a section does not turn out as planned, scrape it away gently and try again. Buttercream is forgiving, and most small mistakes can be covered with a border, flower, or cluster of dots.
A Simple Design to Try
For a beginner-friendly vintage-inspired cake, cover a round cake with pale cream frosting. Pipe a shell border around the bottom edge using a star tip. Add a second border around the top edge in soft pink. Pipe three small rosettes on one side of the top, then add green leaves and a few yellow dots.
Finish with a short message in the center or leave the middle open. This design uses only a few shapes, but the layered borders and gentle color palette create a classic, decorative finish.
The craft of vintage-inspired cake decorating is built on patience, repetition, and personal style. Start with simple piping, choose colors you enjoy, and let the cake retain a little of its handmade character. With a few basic tools and a willingness to practice, you can create beautiful cakes that feel both timeless and completely your own.
About the Author